1. Lighting and Sound, Day 1/2
Lights, camera, action! We are going to play with the cameras, lights, and sound equipment to do a series of four screen tests. You’ll get together in groups of three to shoot the “Lighting and Sound” exercise. Please ensure that at least two of your group members were present during yesterday’s demonstration. You’ll have all day today and tomorrow to get four lighting scenarios (of your choosing) and four sound setups. Make sure to come back to the room twenty minutes early to go over the process for importing your audio and video and returning your film equipment.
Each clip should:
- Be at least five seconds long
- Be clearly labelled with the shot type and sound recording method
- Have the subject say the shot type and sound recording method
Pick four of the following seven lighting scenarios that you want to replicate, trying to attempt at least one “medium” and one “hard” difficulty shot:
- A “Scary Face” Shot (Easy): Subject is lit by a single lighting source from a low angle with little to no key lighting to fill in the shadows, i.e. spooky ‘fireside’ lighting.
- A silhouette shot (Easy): Subject is lit from behind with little to no key lighting to fill in their figure, i.e. the subject is a black ‘outline.’
- A backlit shot with NO silhouette (Medium): Subject is lit from behind BUT has key lighting to fill in the would be shadows, i.e. background and subject are both well exposed and visible.
- A “Shallow Depth of Field” shot (Easy): a shot with the subject close to the foreground and a background that is completely blurred out.
- A “venetian blind” shot (Hard): an object is between the subject and the lighting source that casts shadows directly on to the subject, i.e. the classic ‘private detective peering out the window’ shot
- A “candlelight” shot (Medium): the subject is appears to be lit by a small, single light source (like a phone, computer, or candle), although the actual light source may simply be concealed by some trickery, i.e. the ‘on my phone in bed’ shot.
- A “rim lighting” shot (Hard): the subject is lit solely by acute, ninety-plus degree light source(s), i.e. the ‘I can see their hair but not their face’ shot.

For each of your shots, you should use a different sound recording method. You should use each of the following on one of your shots:
- The onboard, built-in microphone (bad quality)
- The Rode ‘Shotgun’ Microphone, i.e. the one that mounts on top of the camera (okay quality)
- Handheld recorder (phone or H4N Zoom) that is recorded on a separate device and synced to the video afterwards (better quality)
- The “Saramonic” and boom that is wired directly into the camera (best quality)
When you are done, you should each edit the footage together, equalize the audio, and create a single video file and submit it through Teams. Be sure to include your production logo at the beginning!
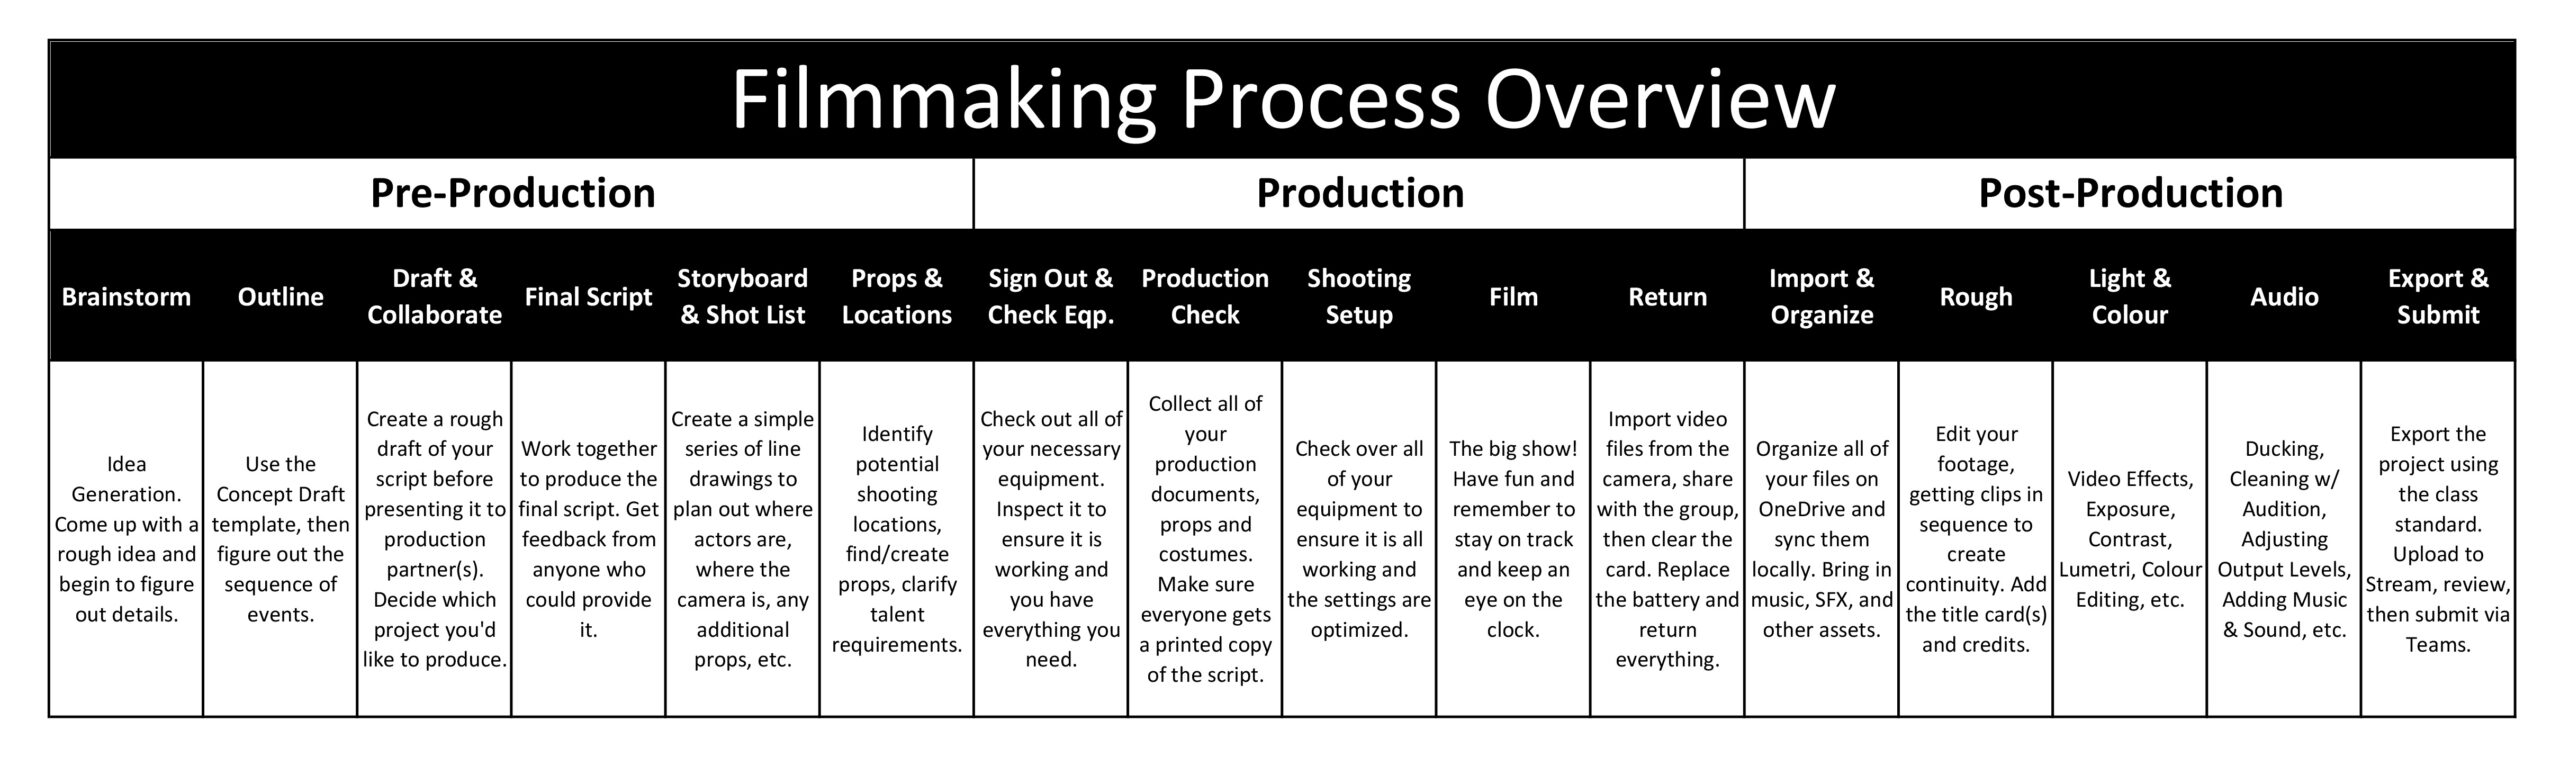
2. Equipment Check
Equipment Check:
- Camera: Ensure the lens cap is kept somewhere safe.
- SD Card: With the cameras in a metal tin. Insert it and format the card to clear it.
- Battery: Kept at the front of the class. Ensure your battery is fully charged.
- Stabilization: Grab a tripod. Make sure you know how to manipulate it before leaving.
- Sound Recording: Grab a sound kit. Make sure the capture device and microphone have battery.
- Boom pole: Grab a boom pole. Make sure it is the appropriate size for your microphone.
- Bags: Bring the bags with you or store them safely in the classroom.
Production Check (Not Applicable Today):
- Props: Make sure you have all of your props ready to go before heading out.
- Costumes: Keep costumes at school and separate from daily clothes.
- Scripts: Have enough copies of your script with lines highlighted if possible.
- Production Documents: Ensure you have your shot list, storyboard, and a copy of the script for the director. Keep them organized with a clipboard and pen.
Shooting Check:
- Camera Setup: Place the tripod in an appropriate location with the legs fully expanded for stability. Install the camera on it.
- Sound Setup: Set up all of your sound equipment appropriately. This will vary based on equipment.
- Balance Exposure: Hold the “Av+/-“ button and scroll the wheel to set the exposure to evenly balanced.
- Configure ISO: Press the ISO button and make sure it is appropriately set. Rule of thumb: Outside = ISO 100/200, Inside = ISO 400/800, Dark Room = ISO 1600, Never = ISO 3200+
- Set Focus: Rotate the focus ring (at the end of the lens) until the image is in focus. Digitally zoom with the blue + at the top-right corner to make sure it’s properly set.
- Record: Press the red button to start and stop recording.
Return Check:
- Save Footage: Copy footage to at least one of your computers. You can transfer it to OneDrive or to other machines if time permits.
- Battery: Place the used battery on a charger and the light will turn red to indicate charging. If any of the batteries are done charging (indicated by the green light).
- Camera: Ensure the lens cap is placed on the lens. Return the camera to the bag and bring the bag back to the equipment closet.
- Sound: Return the audio equipment to its bag and return it to the closet.
- SD Card: Return the SD card to the metal tin.
- Stabilization and Boom: Return the tripod and boom to their respective drawers.
- Production Documents: Keep your shot list and other production documents somewhere safe.
3. Importing 101
In the last ten minutes, we will quickly look at the process for importing audio and video onto you computer.
 With the Canon DSLR Cameras:
Open the port on the right side of the camera and press in on the SD card and it will pop out. There is a reader built into the back of the Mac computers on the bottom-right side. Insert the card and a disk will pop up on your desktop. Go to DCIM > 100CANON and copy all of the contents to your OneDrive folder, then share it afterwards with your groupmates. Once you’ve checked that you have a working copy of the footage, it is important to wipe the card clear so it doesn’t fall into the wrong hands!
With the H4N/Zoom Handheld Recorder:
Do not open the port on the right side of the device. Retrieve a USB cable from the bottom of the sound cabinet or from the front of the classroom and plug it in to the hat-shaped USB port on the left side of the device. Press in on the wheel on the top-left corner to indicate that you want to connect to the computer as a storage device. A disk called “H4N_SD” will pop up on your desktop. The audio that you just recorded should be in Stereo > FOLDER01 and copy all of the clips that your recorded (press spacebar to do a quick preview!) to your computer’s hard drive. After you and everyone in your group has obtained a copy of the audio, it is a good habit to wipe the card clear so it doesn’t fall into the wrong hands! If you cannot find your footage in FOLDER01, it may have been placed in another folder instead and you might have to poke around to locate it.